其他
完整应用

deepseek-harness
deepseek-ai
DeepSeek Harness: Everything is a Plugin.

jerryxugit-2026/dsh-web-companion
Chrome side panel that puts the DeepSeek Harness (DSH) agent next to the page you are reading — read it, or let the agent work it. Built on DeepSeek Harness; not affiliated with or endorsed by DeepSeek.
PROJECT TOPICS
INSTALL REFERENCE
dsh plugin --profile web add github:jerryxugit-2026/dsh-web-companion
该命令指向仓库当前默认分支;尚无绑定当前 commit 的完整验证结果。
PROJECT README
English (this section) · 中文 · Install guide · 安装部署
An AI agent that sits next to the web page you are looking at, in the Chrome side panel. It reads the page for you, and — when you turn that on — it also works the page: fills forms, translates, clicks, collects things from several tabs into one place.
It runs on your own computer (through DeepSeek Harness). Nothing is sent to a third-party browser service.
What you actually do — three things, nothing else:
Everything else — including building the extension — the wizard does for you. No compiler, no Xcode, no developer tools: only Node 22 or newer.
I am Jerry. I found that a browser side panel plus an AI agent solves a big class of everyday "doing things on the web" problems — the ones that used to mean copying and pasting back and forth:
At first I used a Chrome + ChatGPT extension, and it was genuinely great. But I noticed that many people in China cannot use ChatGPT, while DeepSeek 4.1 Flash is already very good and is available in China. Yet DeepSeek Harness had no such extension. So I built this one.
That is the whole reason: the experience I liked, made usable by the people around me, running locally.
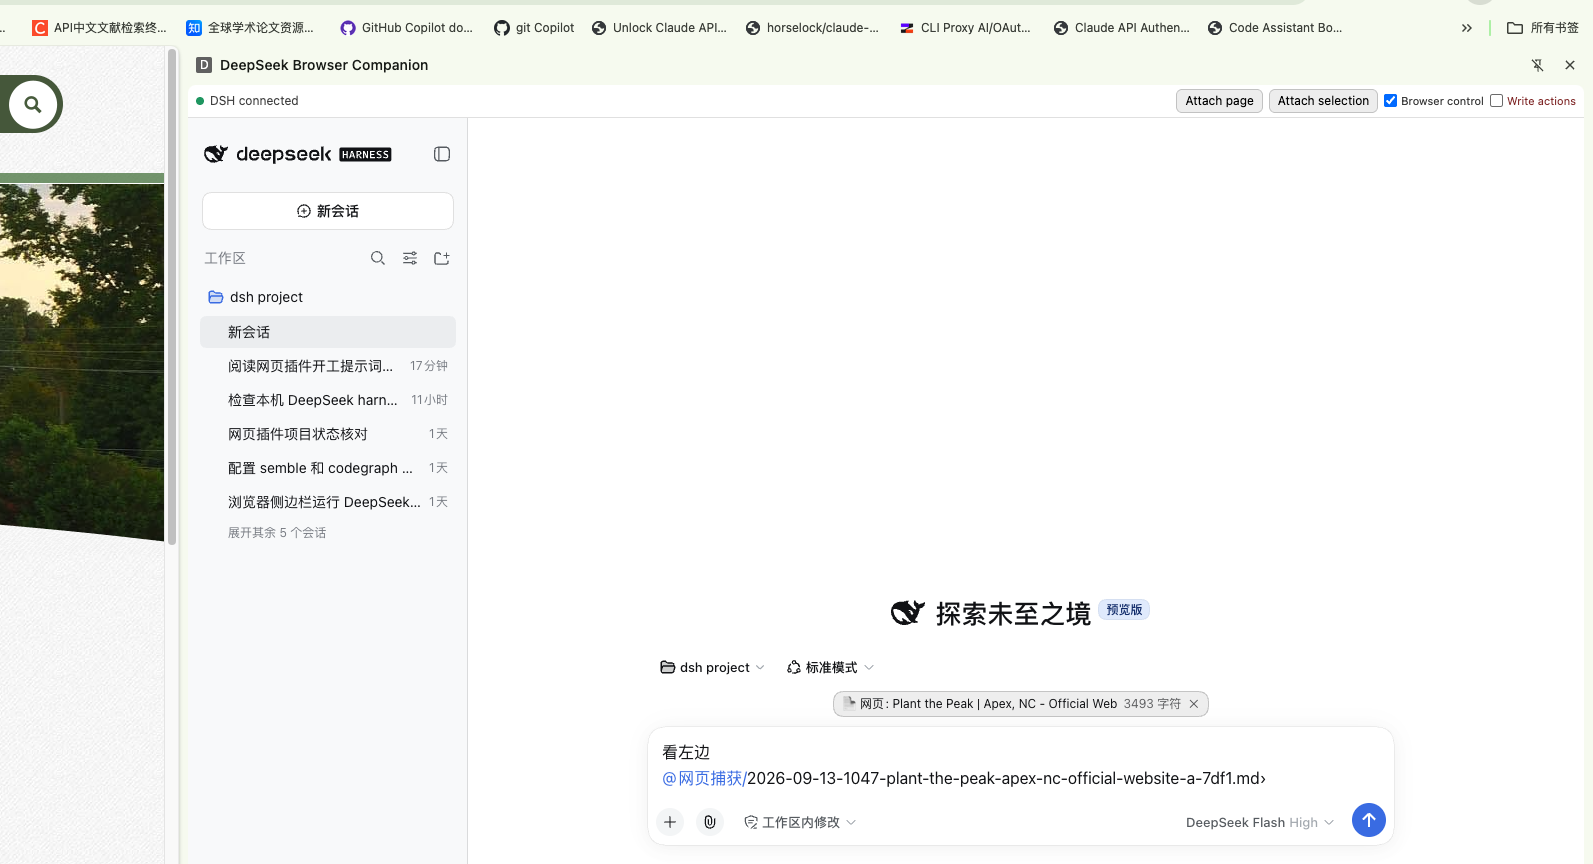
You open the side panel, and you have an agent that can see the page you are on.
Everything it captures is saved in your workspace as a normal Markdown file, and referenced in the chat as
@网页捕获/….md — so you can read, edit, keep or delete it like any other file.
┌──────────────────────────── Chrome ────────────────────────────┐
│  the page you are on                side panel                 │
│  ┌──────────────┐                  ┌─────────────────────────┐ │
│  │  web page    │                  │ Companion panel         │ │
│  │              │                  │ page / selection / shot │ │
│  └──────┬───────┘                  │ control / write switch  │ │
│         │ reads the page           └───────┬─────────────────┘ │
│         ▼                                  │ shows the DSH UI   │
│  ┌──────────────────────┐         ┌────────▼─────────────────┐ │
│  │ extension background │         │ DSH chat UI (in a frame) │ │
│  └────────┬─────────────┘         └────────┬─────────────────┘ │
└───────────┼────────────────────────────────┼───────────────────┘
            │  local connection              │  local connection
            ▼                                ▼
   ┌──────────────────────────────────────────────────────────┐
   │  DeepSeek Harness — running on your computer             │
   │    └ the Companion plugin (inside DSH)                   │
   │       · talks to the browser                             │
   │       · gives the AI its browser abilities               │
   │       · asks you before any change is made               │
   │       · saves the captures and keeps a local log         │
   └──────────────────────────────────────────────────────────┘
            ▲  lets Chrome start DSH when it is not running
      ┌─────┴──────┐
      │ small      │
      │ launcher   │
      └────────────┘
Three small pieces, all on your machine:
The easiest possible version would be: put DSH in the side panel, type "look left", grab the page text. I did not stop there, because that version only reads:
The short version: it all runs on your computer, and nothing happens without your consent.
You do not need the green Code button, and you do not need git. GitHub has a page made for
exactly this: Releases. Here is what to click.
Open this page — https://github.com/jerryxugit-2026/dsh-web-companion/releases
(Or open the project page and click Releases, in the right-hand column.)
You will see the newest entry at the top (currently v3.47.3). Click its title.
On that page, scroll to the very bottom — the last section is called Assets.
Under it, click the one that says Source code (zip). A .zip file starts downloading.
(Ignore Source code (tar.gz) unless you know you want it; ignore everything above Assets.)
Find the downloaded file — usually in Downloads — and double-click it to unzip.
You get a folder whose name starts with dsh-web-companion.
Move it somewhere you will find again (your home folder is fine).
(Comfortable with git? git clone https://github.com/jerryxugit-2026/dsh-web-companion.git
gives you the same thing.)
What you are downloading (and what you are not): only the project's own source. There is no
node_modules, no pre-built extension, and no keys inside. That is why the download is small.
There is no build step for you, and nothing gets downloaded behind your back. You install the two prerequisites yourself with copy-paste commands (below); the wizard then checks them, tells you exactly what is missing if anything is, and builds the Chrome extension for you (a few seconds). You never open a compiler, and you do not need Xcode or any developer tools.
The installer deliberately does not download or install anything. It used to decide by itself and
pull things in; that turned out to be wrong in practice — on a machine that already had DeepSeek Harness
installed from source, the check only looked at PATH, did not see it, and would have installed a
second copy. So now it reports: what is missing, where it goes, and the exact command to run. One
exception — the only thing it ever writes for a dependency is a symlink to an esbuild
you already have, instead of downloading one. And if a dependency is missing it stops before writing a
single file.
Why is the extension not already built inside the download? Because the build bakes in your DSH port and your pairing key. A pre-built copy would simply not work on your machine — so the wizard builds it locally instead.
You need macOS, Node 22 or newer and Chrome.
Two things you install yourself first. The wizard checks them and tells you the exact command if one is missing — but it will not install them for you:
# 1. DeepSeek Harness — the host program the plugin lives inside.
#    Pin the version: npm's `latest` for its sub-packages is a broken stub.
npm install -g @deepseek-ai/dsh@0.1.5-rc.2

# 2. esbuild — used once, to build the Chrome extension (~11 MB).
#    The wizard prints the exact command for your folder if it is missing.
npm install --prefix "<the folder you unzipped>/extension" esbuild
Already have DeepSeek Harness from a source checkout (a git clone with no node_modules)? That is
source, not a working install — build it first, or leave it alone and install the published package as
above. If you run it from a custom location, point the wizard at its launcher: --dsh <path-to-dsh>.
Getting the Terminal into the right folder (the part everyone gets stuck on):
Cmd + Space, type Terminal, press Enter — a black window opens.cd — the letters c, d and one space — then drag the unzipped folder from Finder into
that window (the path types itself), and press Enter.node bootstrap/install.mjs # dry run: it only prints what it *would* change
node bootstrap/install.mjs --apply # the real thing: it asks you before every stepThe one typo nearly everybody makes: the file is bootstrap/install.mjs — with a slash,
because install.mjs sits inside the bootstrap folder. bootstrap.install.mjs (a dot) is not a
file, and Node answers Cannot find module. Let it type itself instead: type node boot, press
Tab (it completes to bootstrap/), type in, press Tab again, then Enter.
An absolute path also works from any directory:
node /full/path/to/dsh-web-companion-3.49.1/bootstrap/install.mjsThe wizard will ask you two things before it does anything — where to install the program, and where your DSH data lives. Both come with a sensible default, so just press Enter twice:
? 本程序安装到哪个目录? [/Users/you/Downloads/dsh-web-companion-3.49.1]   ← press Enter
? DSH 数据目录(配对钥匙/凭据放这里)? [/Users/you/.dsh]                            ← press Enter
(The two prompts are in Chinese — the installer is a terminal program written for this project.
It installs into the folder you unzipped — that is the default, and it is safe. The wizard keeps
the sources where they are and adds what it needs next to them (node_modules, the built extension,
a launcher). So the program lives in a folder you can see and delete, instead of scattering itself
somewhere you would have to hunt for. If you would rather put it elsewhere, pass --install-dir <path>
or type a path at that prompt.)
Then, once:
chrome://extensions, turn on Developer mode, click Load unpacked, and choose
the extension/dist folder the installer just built for you.dsh web) so it picks up the plugin, then check everything:node bootstrap/doctor.mjs # verifies DSH, pairing, the built extension, connectivityThe installer asks you where to install and where your DSH data lives. It checks Node, DSH, Chrome and the
port; installs DSH if it is missing; builds the extension on your machine; adds one line to your DSH
settings (after backing it up); and then verifies the result. To remove it again:
node bootstrap/uninstall.mjs.
(Windows is not supported. The installer says so and stops, rather than pretending.)
Design docs, the changelog and the ledger live in docs/. The model-facing tools are
browser_read, browser_tabs, browser_wait, browser_screenshot, browser_ax, plus gated write
operations; the two local channels are /ag/agent (extension) and /ag/client (DSH page).
npm run check runs the whole gate suite; npm run probe:all runs the real-Chrome probes.
English(见上) · 中文(本节) · 安装说明 · 安装部署
一个 AI agent,就坐在你正在看的网页旁边 —— 在 Chrome 侧边栏里。它替你读页面,在你同意时也替你操作页面: 填表、翻译、点击、把好几个标签页里的东西收拢到一处。
它跑在你自己的电脑上(通过 DeepSeek Harness),网页不需要交给任何第三方的浏览器服务。
你实际要做的 —— 只有 3 件事:
其余全部(包括构建扩展)都由向导自己做。不需要编译器、不需要 Xcode、不需要开发者工具, 只需要装好 Node 22 或更高版本。
我是 Jerry。我发现浏览器侧边栏 + AI agent 能解决一大类"上网办事"的问题 —— 那些以前只能来回复制粘贴的事:
我最开始用的是 Chrome + ChatGPT 的插件,确实非常好用。但我发现很多人在国内无法使用 ChatGPT, 而 DeepSeek 4.1 Flash 已经非常好用、国内可以直接用。可是 DeepSeek Harness 没有这样的扩展程序。 于是我自己做了这个。
理由就这么简单:把我喜欢的那种体验,做成身边的人能用、而且跑在本地的东西。
点开侧边栏,你就有了一个看得见当前页面的 agent。
它抓到的内容会作为普通 Markdown 文件存在你的工作目录里,并在对话中以 @网页捕获/….md 引用 ——
你可以像对待任何文件一样读它、改它、留着或删掉。
┌──────────────────────────── Chrome ────────────────────────────┐
│  你正在看的网页                      侧边栏                     │
│  ┌──────────────┐                  ┌─────────────────────────┐ │
│  │   网页        │                  │ Companion 面板          │ │
│  │              │                  │ 页面 / 选区 / 截图      │ │
│  └──────┬───────┘                  │ 浏览器控制 / 写操作开关 │ │
│         │ 读取页面                  └───────┬─────────────────┘ │
│         ▼                                  │ 显示 DSH 界面      │
│  ┌──────────────────────┐         ┌────────▼─────────────────┐ │
│  │ 扩展的后台            │         │ DSH 对话界面(在框里)   │ │
│  └────────┬─────────────┘         └────────┬─────────────────┘ │
└───────────┼────────────────────────────────┼───────────────────┘
            │  本机连接                       │  本机连接
            ▼                                ▼
   ┌──────────────────────────────────────────────────────────┐
   │  DeepSeek Harness —— 跑在你的电脑上                       │
   │    └ Companion 插件(在 DSH 进程内)                      │
   │       · 与浏览器通信                                      │
   │       · 给 AI 浏览器能力                                  │
   │       · 任何改动之前先问你                                │
   │       · 保存抓取内容并留一份本机日志                       │
   └──────────────────────────────────────────────────────────┘
            ▲  让 Chrome 在 DSH 没跑时把它拉起来
      ┌─────┴──────┐
      │ 小启动器    │
      └────────────┘
三块小东西,全在你机器上:
最省事的版本是:把 DSH 放进侧边栏,打一句「看左边」,把页面文字抓过来。我没有停在那里,因为那个版本只会读:
一句话:全部跑在你的电脑上,没有你的同意就什么都不做。
不要点绿色的 Code 按钮,也不需要 git。GitHub 有一个专门给这件事的页面叫 Releases。
你要点的就是下面这几下:
打开这个页面 —— https://github.com/jerryxugit-2026/dsh-web-companion/releases
(或者打开项目主页,在右侧栏点 Releases。)
你会看到最上面那一条(当前是 v3.47.3),点它的标题。
进去后拉到页面最下面,最后一块区域叫 Assets。在它下面点 Source code (zip)
那一项,浏览器就开始下载一个 .zip。
(除非你明确知道自己要,否则不要选 Source code (tar.gz);Assets 上面那些内容也都不用管。)
找到刚下载的文件(通常在下载文件夹),双击解压。你会得到一个名字以
dsh-web-companion 开头的文件夹。把它挪到你找得到的地方(比如你的主目录)。
(熟悉 git 的话,git clone https://github.com/jerryxugit-2026/dsh-web-companion.git
拿到的是同一份东西。)
你下载到的(以及没有下载到的):只有项目自己的源码。里面没有 node_modules、没有预先构建好的扩展、
没有任何钥匙。所以下载包很小。
没有需要你做的编译步骤,也不会有东西在你不知情时被下载。 两个前置依赖由你自己用一条可复制的 命令装好(见下),向导只负责检查它们、缺什么就明确告诉你、然后替你构建 Chrome 扩展(只要几秒)。 你不用打开任何编译器,也不需要 Xcode 或任何开发者工具。
安装器是故意不下载、不安装任何东西的。 它原来会自己判断、自己去下 —— 实测下来这是错的:
有台机器上 DeepSeek Harness 是用源码装的,而检查只看 PATH,没看见它,于是差点又装一份全局的。
所以现在它只报告:缺什么、装到哪、跑哪条命令。唯一的例外是:一旦发现关键依赖缺失,它会
在写任何一个文件之前就停下来。依赖层唯一的例外是:本机已经有一份 esbuild 时,它建一个符号链接过去复用,
而不是下载。
为什么下载包里不直接放构建好的扩展? 因为构建会把你的 DSH 端口和你的配对钥匙烤进去; 预构建的副本在你机器上根本跑不起来,所以由向导在本机替你构建。
需要 macOS、Node 22 或更高、Chrome。
有两个东西要你自己先装好。 向导会检查它们、缺了就告诉你确切的命令 —— 但它不会替你装:
# 1. DeepSeek Harness —— 插件寄宿的那个宿主程序。
#    版本要钉死:它在 npm 上的 `latest` 子包是个跑不起来的 stub。
npm install -g @deepseek-ai/dsh@0.1.5-rc.2

# 2. esbuild —— 只在构建 Chrome 扩展时用一次(约 11 MB)。
#    缺了的话,向导会连你的路径一起把确切命令打出来。
npm install --prefix "<你解压出来的那个文件夹>/extension" esbuild已经有一份源码形式的 DeepSeek Harness(git clone 下来、没有 node_modules)?那是源码,
不是能跑的安装 —— 先把它装起来,或者干脆不管它、按上面装官方发布的包。如果你的 DSH 跑在自定位置,
用 --dsh <dsh 的路径> 点给向导。
怎么让终端进到那个文件夹(大多数人卡在这一步):
Cmd + 空格,输入 Terminal(终端),回车 —— 会开一个黑窗口。cd 再加一个空格,然后把刚才解压出来的文件夹从访达(Finder)拖进这个窗口
(路径会自己填上),按回车。node bootstrap/install.mjs # dry run:只打印"打算"改哪些文件
node bootstrap/install.mjs --apply # 真装:每一步都会先问你几乎所有人都会打错的一个地方:是 bootstrap/install.mjs —— 中间是斜杠,因为 install.mjs
在 bootstrap 文件夹里面。写成 bootstrap.install.mjs(点)就不是文件了,node 会回你
Cannot find module。省事的办法是让终端替你补全:输入 node boot,按 Tab(自动补成 bootstrap/),
再输入 in,再按 Tab,回车。
用绝对路径也行(在任何目录下都能跑):
node /你的完整路径/dsh-web-companion-3.49.1/bootstrap/install.mjs向导在动手之前会问你两件事 —— 程序装到哪、DSH 数据目录在哪。两个都有合适的默认值, 直接按两次回车就行:
? 本程序安装到哪个目录? [/Users/你/Downloads/dsh-web-companion-3.49.1]   ← 回车
? DSH 数据目录(配对钥匙/凭据放这里)? [/Users/你/.dsh] ← 回车(它就装在你解压出来的那个文件夹里 —— 这是缺省值,而且是安全的。 向导把源码留在原地,
只把需要的东西加到旁边(node_modules、构建出的扩展、拉起器)。这样程序就在一个你看得见、删得掉的
文件夹里,而不是散落到某个你还得去找的地方。想装到别处,就加 --install-dir <路径>,或者在那个
提示处直接输入路径。)
然后一次性的事:
chrome://extensions,开启开发者模式,点加载已解压的扩展程序,
选安装器刚为你构建出来的 extension/dist 文件夹。dsh web)让它加载插件,然后自检:node bootstrap/doctor.mjs # 检查 DSH、配对、构建产物、连通性安装器会问你装到哪、DSH 数据目录在哪;检查 Node、DSH、Chrome 与端口;DSH 缺了就替你装;
在你的机器上现场构建扩展;往你的 DSH 设置里加一行(改前先备份);最后自证一遍。
想卸掉:node bootstrap/uninstall.mjs。
(不支持 Windows。安装器会明确说明并当场停下,而不是假装成功。)
设计文档、变更记录与台账在 docs/。面向模型的工具是 browser_read、browser_tabs、
browser_wait、browser_screenshot、browser_ax,以及受闸门保护的写操作;两条本机通道是
/ag/agent(扩展侧)与 /ag/client(DSH 页面侧)。npm run check 跑全部门禁,npm run probe:all 跑真 Chrome 探针。
CLASSIFICATION EVIDENCE
系统优先读取 GitHub Topics,再与站内分类词典和词根规则比对。当前命中: 无有效分类标签。
deepseek-ai
DeepSeek Harness: Everything is a Plugin.

anywhere-labs
为 DeepSeek Harness (DSH) 插件生态打造的现代化桌面端解决方案。万物皆「插件」,桌面本身也是「插件」。

walkinglabs
Harness engineering beginner tutorial, from 0 to 1